Quick Review
Application Startup: Bootstrapping & Compilation
- Initial Load Sequence
- The process begins when the browser loads
index.html. - This file contains a placeholder tag like
<app-root>. - The Angular CLI injects script tags (
main.js,polyfills.js, etc.) intoindex.htmlduring the build process. - Execution starts with
main.ts, which is the application’s entry point.
- The process begins when the browser loads
- Bootstrapping Models
- NgModule-based (Traditional): Uses
platformBrowserDynamic().bootstrapModule(AppModule)inmain.ts.AppModuleacts as a manifest, declaring the root component in itsbootstraparray. - Standalone (Modern): Uses
bootstrapApplication(AppComponent)inmain.ts. This eliminatesNgModules, making dependencies more explicit. The root component must be marked withstandalone: true.
- NgModule-based (Traditional): Uses
- Compilation: JIT vs. AOT
- Just-In-Time (JIT): Compilation happens in the browser at runtime. This was the old default, used for development due to faster rebuilds. It results in larger bundles (includes the compiler) and slower initial rendering.
- Ahead-of-Time (AOT): Compilation happens during the build process. This is the modern default for production.
- Benefits: Faster rendering, smaller bundle size (compiler is excluded), early error detection (template errors found at build time), and enhanced security.
Component Lifecycle Hooks
- Sequence of Execution:
constructor->ngOnChanges->ngOnInit->ngDoCheck->ngAfterContentInit->ngAfterContentChecked->ngAfterViewInit->ngAfterViewChecked->ngOnDestroy. - Key Hooks & Purpose:
constructor: A TypeScript feature, not an Angular hook. Its primary role is Dependency Injection (DI). It runs first.ngOnInit: Called once after the component is initialized and all@Input()properties are available. Used for complex initialization and initial data fetching.ngOnChanges: Called beforengOnInitand whenever an@Input()property’s value changes. It receives aSimpleChangesobject with previous and current values.ngAfterViewInit: Called once after the component’s view and its children’s views are fully rendered. Used for DOM manipulation that requires the view to be present (e.g., initializing a third-party library on a canvas).ngOnDestroy: Called just before the component is destroyed. Used for cleanup to prevent memory leaks, such as unsubscribing from observables or detaching event listeners.
Change Detection: The Reactivity Engine
- Core Mechanism vs. Virtual DOM
- Angular does not use a Virtual DOM.
- Instead, it performs dirty checking. For each component, the compiler generates code that compares the current values of template expressions against their previous values. If a value has changed, Angular updates that specific part of the DOM directly.
- The Role of
zone.js(Traditional Model)- How it works:
zone.js“monkey-patches” all browser asynchronous APIs (setTimeout,Promise, DOM events like clicks, etc.). - Trigger: When an async operation completes,
zone.jsnotifies Angular’sNgZone. - Result:
NgZonetriggers a change detection cycle starting from the root of the component tree, proceeding top-down. This makes UI updates feel automatic to the developer.
- How it works:
- Performance Optimization
OnPushStrategy: A component withchangeDetection: ChangeDetectionStrategy.OnPushis only checked if one of its@Input()references changes, an event originates from it, or it’s manually marked for a check. This prevents unnecessary checks on the component and its entire subtree.ChangeDetectorRef: An injectable service for manual control.markForCheck(): The preferred method forOnPushcomponents. It marks the component and its ancestors as dirty, ensuring they will be checked during the next change detection cycle.detectChanges(): Immediately runs change detection on the component and its children.
The Future: Zoneless Rendering with Signals
- Motivation for Going Zoneless
- Performance:
zone.jsis indiscriminate and can trigger too many unnecessary change detection cycles. A zoneless model allows for precise, surgical updates. - Bundle Size: Removing the
zone.jslibrary makes the application smaller and faster to load. - Developer Experience: Eliminates the “magic” of
zone.js, making stack traces cleaner and the cause of UI updates more explicit and predictable.
- Performance:
- Angular Signals: The New Primitives
signal()(Writable): A wrapper for a value. You read it by calling it like a function (mySignal()) and update it with.set()or.update().computed()(Read-only): A signal whose value is derived from other signals. It automatically tracks its dependencies and updates only when they change. The result is memoized (cached).effect()(Side Effects): An operation that runs whenever a signal it depends on changes. Used for tasks like logging, syncing tolocalStorage, or imperative DOM manipulation.
- How the Zoneless Model Works
- Fine-Grained Reactivity: Instead of the environment (
zone.js) triggering checks, the data itself (the signal) notifies the framework of a change. - Automatic Dependency Tracking: When a signal is read in a template, Angular registers that part of the view as a consumer.
- Surgical Updates: When the signal is updated, Angular knows exactly which DOM nodes depend on it and updates only those parts, achieving true local change detection.
- Explicit Triggers: In a zoneless world, change detection is triggered by updating a signal, a bound template event, the
asyncpipe, or a manual call tomarkForCheck(). Asynchronous operations likesetTimeoutno longer trigger updates automatically.
- Fine-Grained Reactivity: Instead of the environment (
The Genesis of an Angular Application: Bootstrapping and Compilation
The transformation of an Angular application from a collection of TypeScript files and HTML templates into a dynamic, interactive experience within a web browser is a sophisticated process orchestrated by the Angular framework and its associated tooling. This initial phase, known as bootstrapping, involves a precise sequence of loading, compilation, and initialization steps that set the stage for the application’s entire lifecycle. Understanding this genesis is fundamental to comprehending Angular’s architecture, its performance characteristics, and the evolution of its design philosophy.
From index.html to Execution: The Initial Load Sequence
The entire lifecycle of an Angular application begins when a user’s browser requests and loads a single HTML file: index.html.1 In its source form, typically found in the src directory of a project, this file is deceptively simple. It serves as the primary container for the application but contains minimal content, most notably a custom HTML tag like <app-root></app-root> that acts as a placeholder for the application’s root component.3
Initial index.html (Source)
HTML
<!doctype html>
<html lang="en">
<head>
  <meta charset="utf-8">
  <title>AngularApp</title>
  <base href="/">
  <meta name="viewport" content="width=device-width, initial-scale=1">
  <link rel="icon" type="image/x-icon" href="favicon.ico">
</head>
<body>
  <app-root></app-root>
</body>
</html>
The true complexity is introduced during the build process, managed by the Angular Command Line Interface (CLI). When a command like ng build is executed, the CLI invokes tools like Webpack to compile the application’s TypeScript code into browser-compatible JavaScript, process CSS files, and bundle all assets into a set of optimized files.3 The CLI then injects
<script> tags for these bundles into a new version of index.html located in the output directory (usually dist/). These bundles typically include runtime.js (Webpack’s runtime logic), polyfills.js (for browser compatibility), styles.js (for global styles), and main.js (containing the compiled application code).1
Compiled index.html (Output)
HTML
<!DOCTYPE html>
<html lang="en">
<head>
  <meta charset="utf-8" />
  <title>AngularApp</title>
  <base href="/" />
  <meta name="viewport" content="width=device-width, initial-scale=1" />
  <link rel="stylesheet" href="styles.css" />
</head>
<body>
  <app-root></app-root>
  <script src="runtime.js" type="module"></script>
  <script src="polyfills.js" type="module"></script>
  <script src="main.js" type="module"></script>
</body>
</html>
The blueprint for this entire build and bootstrapping process is the angular.json file. This configuration file instructs the Angular CLI on every aspect of the project, including the crucial entry point for the application, which is defined by the main property under the build architect options and almost universally points to src/main.ts.1 When the browser loads the compiled
index.html and executes the script bundles, the main.js file (the JavaScript version of main.ts) takes control and officially begins the Angular bootstrapping process.2
The Evolution of Bootstrapping: NgModules vs. Standalone APIs
The mechanism for initiating an Angular application in main.ts has evolved, reflecting a broader architectural shift within the framework towards simplification and more explicit dependency management. This evolution is best understood by comparing the traditional NgModule-based approach with the modern standalone component API.
Traditional NgModule-based Bootstrapping
For many years, NgModule was the fundamental organizational unit in Angular. In this model, the main.ts file uses the platformBrowserDynamic function to create a platform instance and then calls bootstrapModule to launch the application’s root module, typically AppModule.1
main.ts (NgModule-based)
TypeScript
import { platformBrowserDynamic } from '@angular/platform-browser-dynamic';
import { AppModule } from './app/app.module';

platformBrowserDynamic().bootstrapModule(AppModule)
 .catch(err => console.error(err));
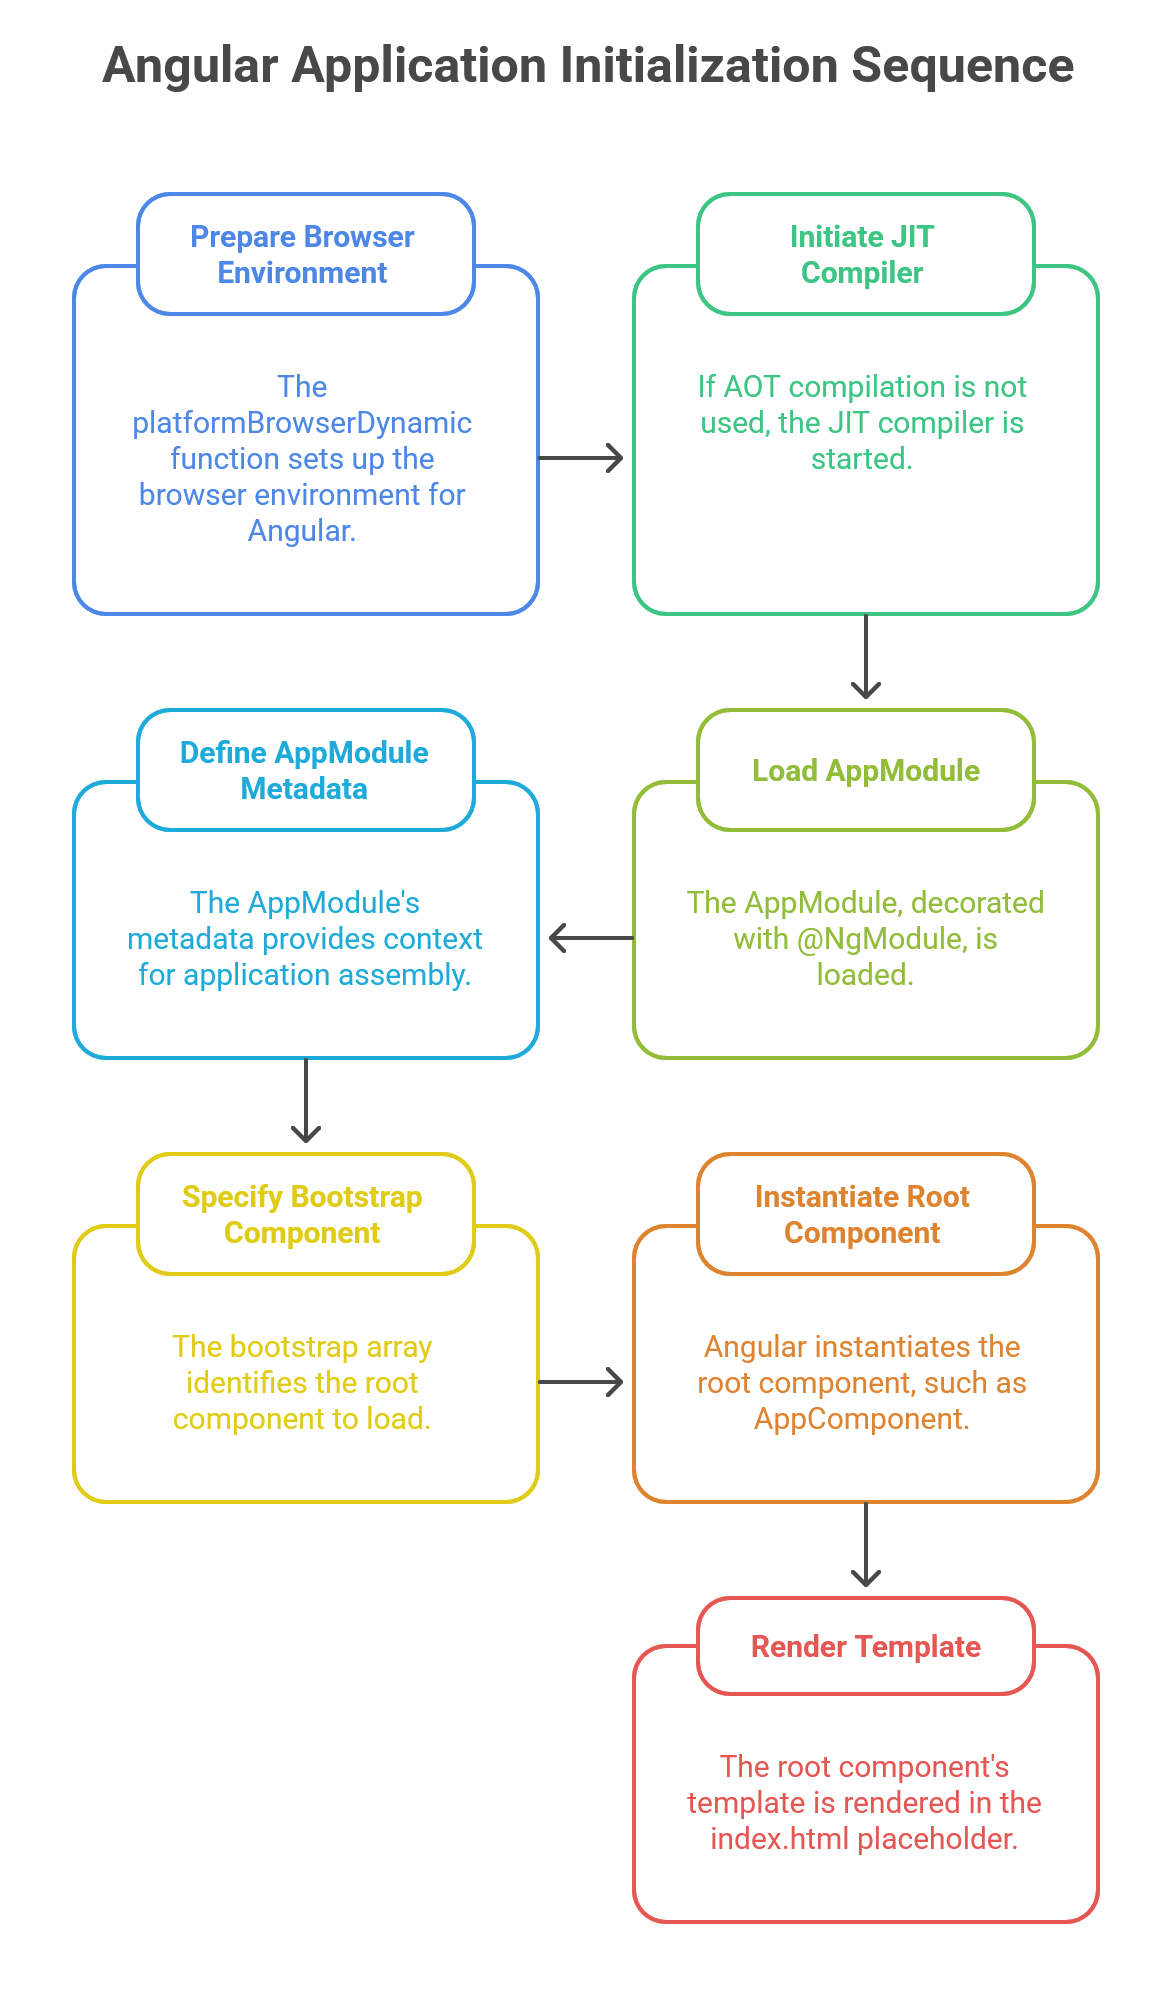
The platformBrowserDynamic function is responsible for preparing the application to run in a browser environment and, if Ahead-of-Time (AOT) compilation was not used, initiating the Just-in-Time (JIT) compiler.2 Once the platform is ready, Angular loads the
AppModule. This module, decorated with @NgModule, serves as the manifest for the root of the application. Its metadata—specifically the declarations, imports, providers, and bootstrap arrays—provides the compiler with a complete context for how the application is assembled.1
The bootstrap array is the final piece of the puzzle; it tells Angular which component to load as the application’s root. Angular then instantiates this component (e.g., AppComponent) and renders its template inside the placeholder tag (e.g., <app-root>) in index.html.1
app.module.ts (Root Module)
TypeScript
import { NgModule } from '@angular/core';
import { BrowserModule } from '@angular/platform-browser';
import { AppComponent } from './app.component';

@NgModule({
  declarations: [
    AppComponent
  ],
  imports:,
  providers:,
  bootstrap: [AppComponent] // Specifies the root component
})
export class AppModule { }
Within this architecture, NgModule is not just an organizational tool but a critical compilation context. It groups related components, directives, and pipes, allowing the Angular compiler to correctly parse templates and resolve dependencies. Without this context, the compiler would not know which selectors correspond to which components or which services are available for injection.6
Modern Standalone Component Bootstrapping
The introduction of standalone components marked a significant architectural simplification. This approach eliminates the need for NgModules, reducing boilerplate and making the dependency graph of an application more explicit. With this model, main.ts uses the bootstrapApplication function to directly bootstrap a root component.5
main.ts (Standalone)
TypeScript
import { bootstrapApplication } from '@angular/platform-browser';
import { AppComponent } from './app/app.component';

bootstrapApplication(AppComponent, {
  providers: [
    // Application-wide providers are configured here
  ]
}).catch(err => console.error(err));
For this to work, the root component must be marked with standalone: true in its @Component decorator. This flag signifies that the component manages its own dependencies without needing to be declared in an NgModule.11 Any application-wide providers or modules (which can be imported using the
importProvidersFrom helper function) are configured directly in the options object passed to bootstrapApplication, removing the need for a root AppModule entirely.11
app.component.ts (Standalone Root Component)
TypeScript
import { Component } from '@angular/core';
import { CommonModule } from '@angular/common';

@Component({
  selector: 'app-root',
  standalone: true, // Marks the component as standalone
  imports: [CommonModule], // Dependencies are imported directly
  template: `<h1>Hello, Standalone World!</h1>`
})
export class AppComponent {
  title = 'standalone-app';
}
This evolution from bootstrapModule to bootstrapApplication is not merely a syntactic convenience. It represents a fundamental architectural shift away from the mandatory complexity and “magic” of NgModules toward a simpler, more transparent dependency management model. Initially, NgModules were essential for providing the compiler with context.6 However, this created significant boilerplate and a steep learning curve. The standalone API directly addresses this by making dependencies explicit at the component level or during bootstrapping, reflecting a broader industry trend towards more transparent framework architectures that improve developer experience and reduce cognitive overhead.
The Compiler’s Role: Just-in-Time (JIT) vs. Ahead-of-Time (AOT) Compilation
Because browsers cannot directly interpret Angular’s HTML templates or TypeScript code, a compilation step is an absolute requirement for any Angular application to run.12 Angular provides two distinct modes for this process: Just-in-Time (JIT) and Ahead-of-Time (AOT). The choice between them has profound implications for performance, bundle size, and security.
Just-in-Time (JIT) Compilation
In the JIT model, the compilation of the application occurs in the browser at runtime.12 When the application loads, the browser receives the TypeScript source code (transpiled to JavaScript), the Angular compiler, and the framework’s runtime. The compiler then parses the component templates and metadata to generate executable JavaScript code on the fly.15
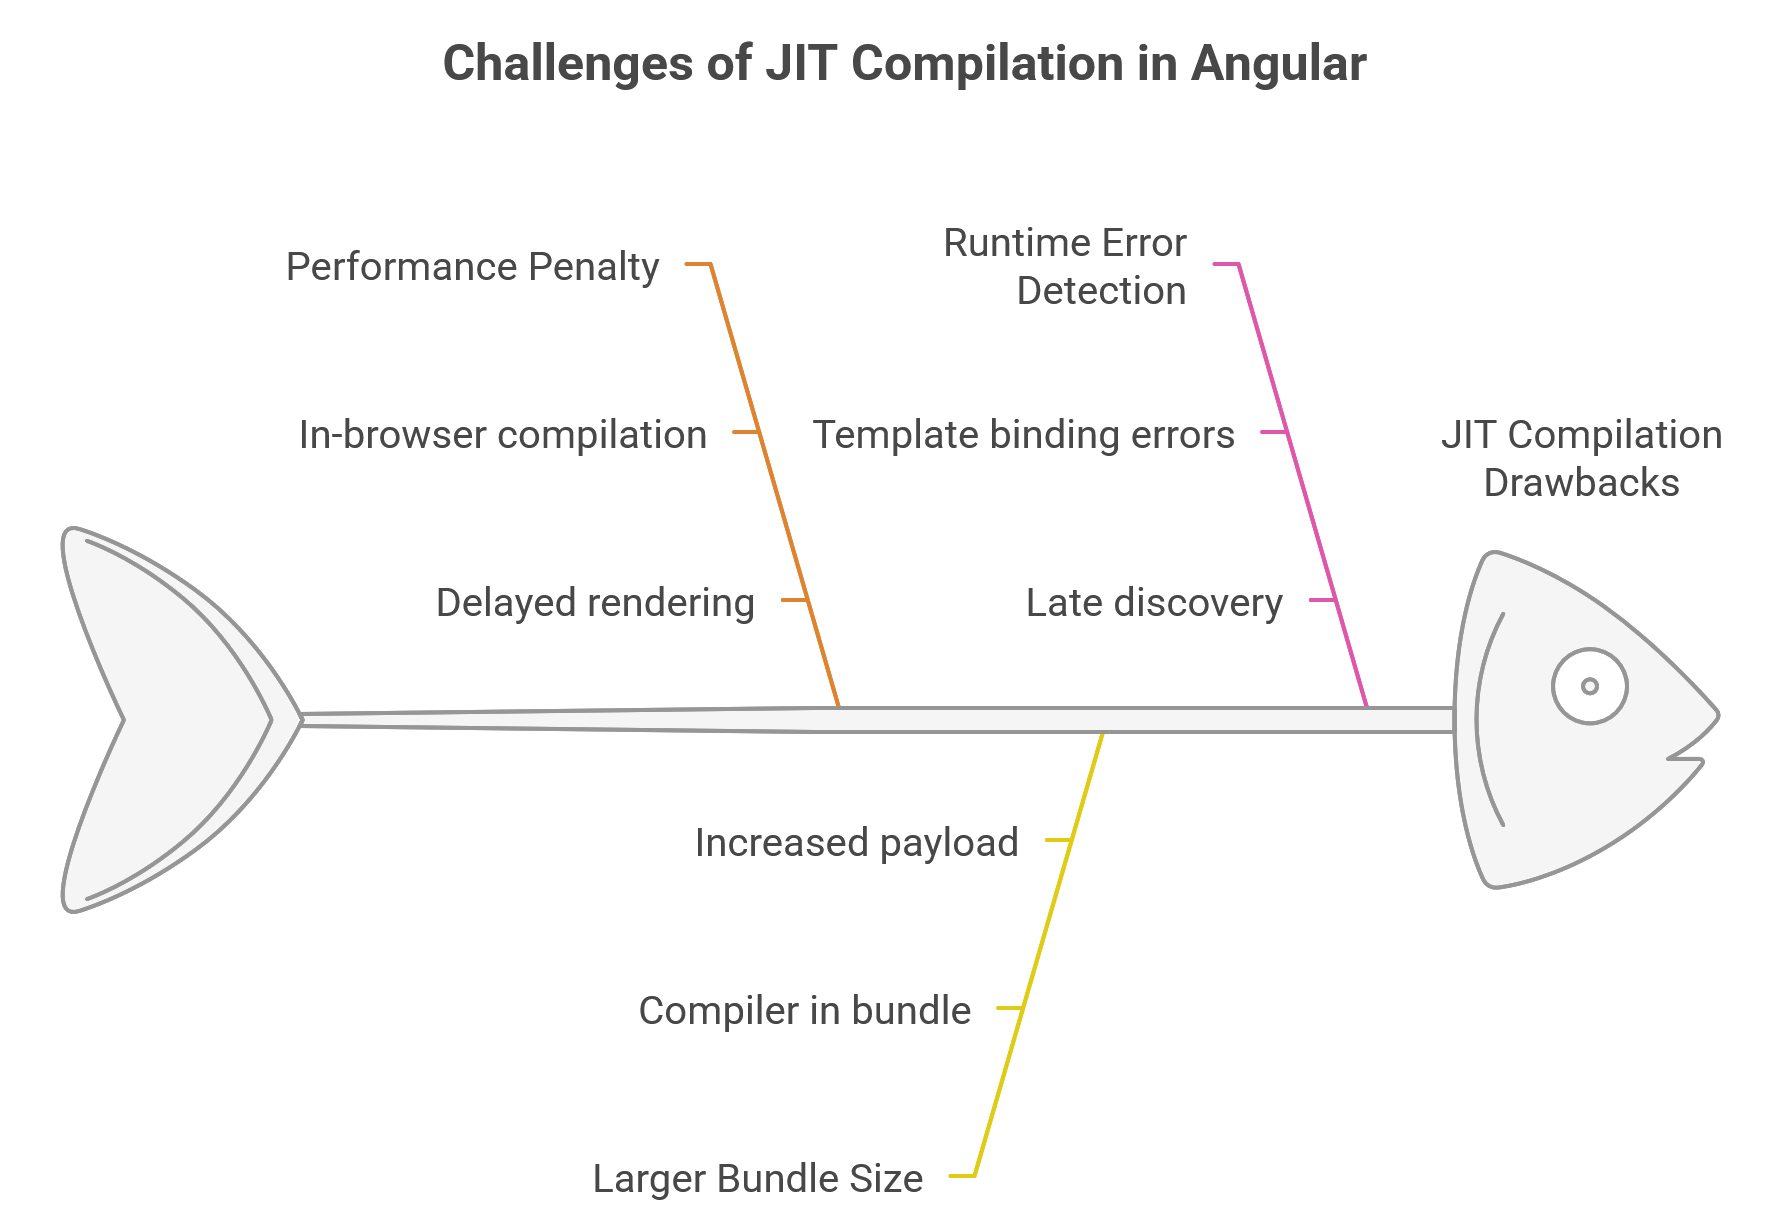
JIT was the default compilation mode until Angular 8 and is primarily used in development environments.12 Its main advantage is a faster development cycle, as changes can be reflected quickly without requiring a full application rebuild.14 However, this convenience comes with significant drawbacks for production environments:
- Performance Penalty: The in-browser compilation step adds to the application’s initial load time, delaying rendering.15
- Larger Bundle Size: The Angular compiler itself must be shipped to the browser as part of the application’s bundle. The compiler constitutes roughly half of the entire Angular framework’s size, dramatically increasing the application payload.15
- Runtime Error Detection: Template binding errors and other compilation-related issues are only discovered when the application runs in the user’s browser, which is late in the development process.15
Ahead-of-Time (AOT) Compilation
In contrast, the AOT model moves the compilation process from the browser to the developer’s build pipeline.12 The Angular CLI performs AOT compilation by default (since Angular 9) when running commands like ng build or ng serve.12 The browser receives a pre-compiled, highly optimized version of the application, ready for immediate execution.
The transition from JIT to AOT as the default signifies Angular’s maturation as a framework that prioritizes production performance, security, and reliability. This shift treats the browser as a pure runtime environment, moving the computational cost of compilation from the end-user’s device to the developer’s build server. This aligns with modern DevOps principles of optimizing early and failing fast. The benefits of AOT are substantial and make it the standard for all production deployments:
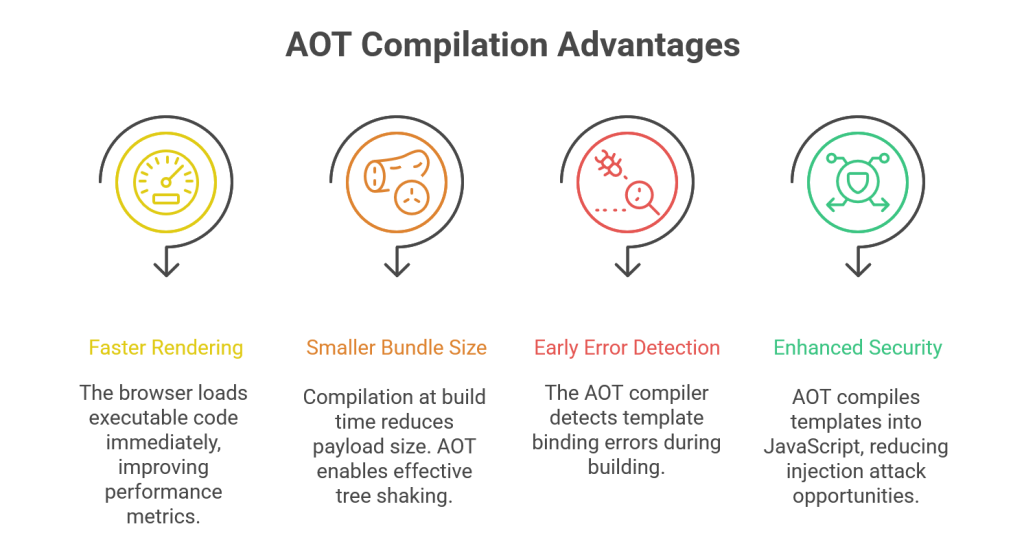
- Faster Rendering: With no compilation to perform, the browser can load the executable code and render the application immediately, significantly improving key performance metrics like First Contentful Paint (FCP).12
- Smaller Bundle Size: Because the compilation is done at build time, the Angular compiler is not included in the final bundle. This drastically reduces the application’s payload size. Furthermore, the AOT process enables more effective tree shaking—a process that eliminates unused code from the final bundle—because the compiler can statically analyze the code and determine exactly which parts of the framework are needed.12
- Early Error Detection: The AOT compiler detects and reports template binding errors during the build step, preventing these bugs from ever reaching users.12
- Enhanced Security: AOT compiles HTML templates and components into JavaScript files long before they are served to the client. With no templates to read or risky client-side evaluation, there are far fewer opportunities for injection attacks.12
The modern Angular compiler, known as Ivy, has further optimized the AOT process. Ivy generates highly efficient, low-level instructions that are embedded directly within the component’s definition (ngComponentDef.template). These instructions are designed to be tree-shakable and perform direct, efficient DOM manipulations, resulting in even smaller bundles and faster runtime performance compared to the previous View Engine compiler.16
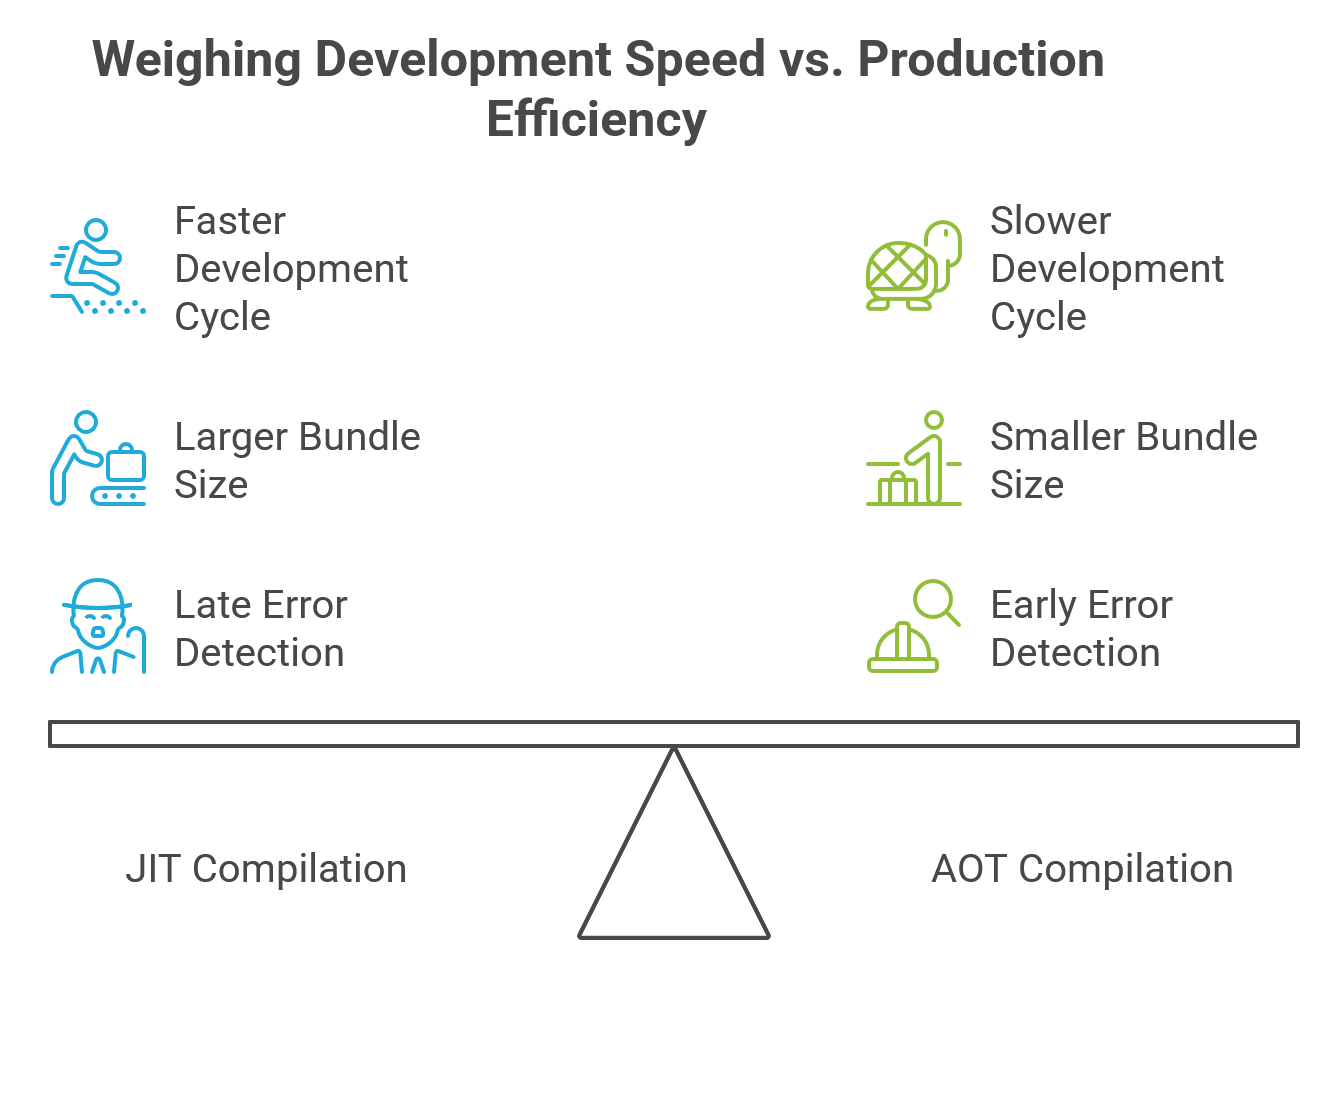
| Feature | Just-in-Time (JIT) Compilation | Ahead-of-Time (AOT) Compilation |
| Compilation Time | At runtime, in the browser | During the build process, before deployment |
| Performance | Slower initial load and rendering due to in-browser compilation | Faster rendering as the browser loads pre-compiled code |
| Bundle Size | Larger, as it includes the Angular compiler | Smaller, as the compiler is excluded and tree shaking is more effective |
| Error Detection | Errors are found at runtime by the user | Template errors are caught during the build process |
| Security | Less secure due to client-side template evaluation | More secure, as there are no templates to evaluate on the client |
| Default In | Angular versions before 9 | Angular versions 9 and later |
The Component Lifecycle: A Chronological Exploration
Every Angular component has a lifecycle managed by the framework, from its creation to its destruction. Angular provides a series of “hooks”—methods that can be implemented on a component’s class—that offer visibility into these key moments and the ability to execute code at specific points in time. The sequence of these hooks is rigid and predictable, as it directly mirrors the flow of Angular’s change detection and rendering engine. Understanding this sequence is essential for performing tasks like initialization, data fetching, and resource cleanup correctly and efficiently.
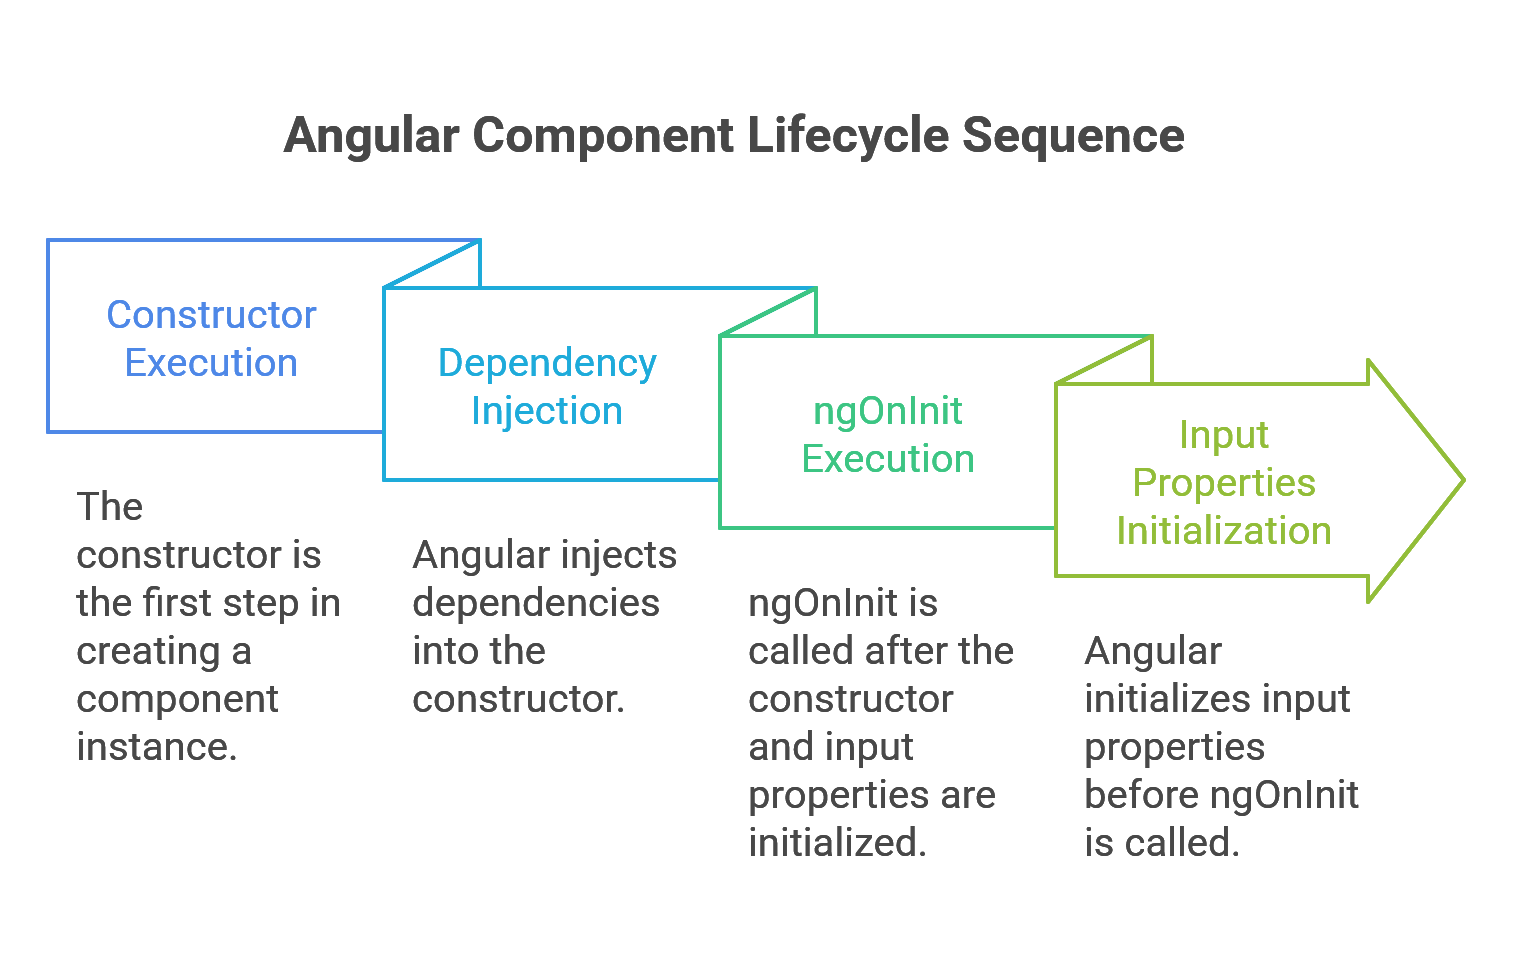
Instantiation and Initialization: constructor vs. ngOnInit
The first two critical stages in a component’s life are its instantiation and its initialization, handled by the constructor and the ngOnInit hook, respectively. While they both execute early, their purposes are distinct and governed by the mechanics of dependency injection and data binding.
- The
constructor: The constructor is a standard feature of TypeScript classes, not an Angular-specific lifecycle hook.22 Its execution is the very first step in creating a component instance. In the context of Angular, its primary and most critical role is Dependency Injection (DI). When Angular creates a component, its dependency injector analyzes the constructor’s parameters, resolves the requested services or other dependencies, and passes them to the constructor.23 Therefore, the constructor should be used exclusively for injecting dependencies and performing simple, initial assignments of member variables that do not rely on any external inputs.23 ngOnInit(): This is the first major lifecycle hook provided by Angular. It is called exactly once per component instance, but only after the constructor has finished and, crucially, after Angular has initialized all of the component’s data-bound input properties (those decorated with@Input()).22 This guarantee—that input properties are available—makesngOnInitthe correct and safe place for complex initialization logic, especially tasks that rely on data passed from a parent component, such as fetching data from a server based on an input ID.23
The separation of concerns between these two methods is a deliberate architectural choice that significantly enhances a component’s testability and predictability.
The constructor is focused on establishing the component’s dependencies, which can be easily mocked during unit testing. The initialization logic in ngOnInit, which may depend on complex inputs, can then be tested separately by manually setting the input properties on the component instance before invoking the ngOnInit method. This decoupling of instantiation from Angular-specific initialization promotes cleaner, more isolated, and less brittle unit tests.22
Code Example: constructor vs. ngOnInit
import { Component, Input, OnInit, inject } from '@angular/core';
import { DataService } from './data.service';

@Component({
  selector: 'app-user-profile',
  template: `<div>User ID: {{ userId }}, Data: {{ userData }}</div>`
})
export class UserProfileComponent implements OnInit {
  @Input() userId: string;
  userData: any;
  private dataService = inject(DataService); // Modern DI via inject()

  constructor() {
    // DO: Use for dependency injection and simple initializations.
    // DON'T: Access @Input properties here. `this.userId` is undefined.
    // console.log('Constructor - userId:', this.userId); // Will log undefined
  }

  ngOnInit(): void {
    // DO: Access @Input properties and perform complex initialization.
    // `this.userId` is now guaranteed to be set.
    console.log('ngOnInit - userId:', this.userId);

    // Ideal place for initial data fetching.
    if (this.userId) {
      this.dataService.fetchData(this.userId).subscribe(data => {
        this.userData = data;
      });
    }
  }
}
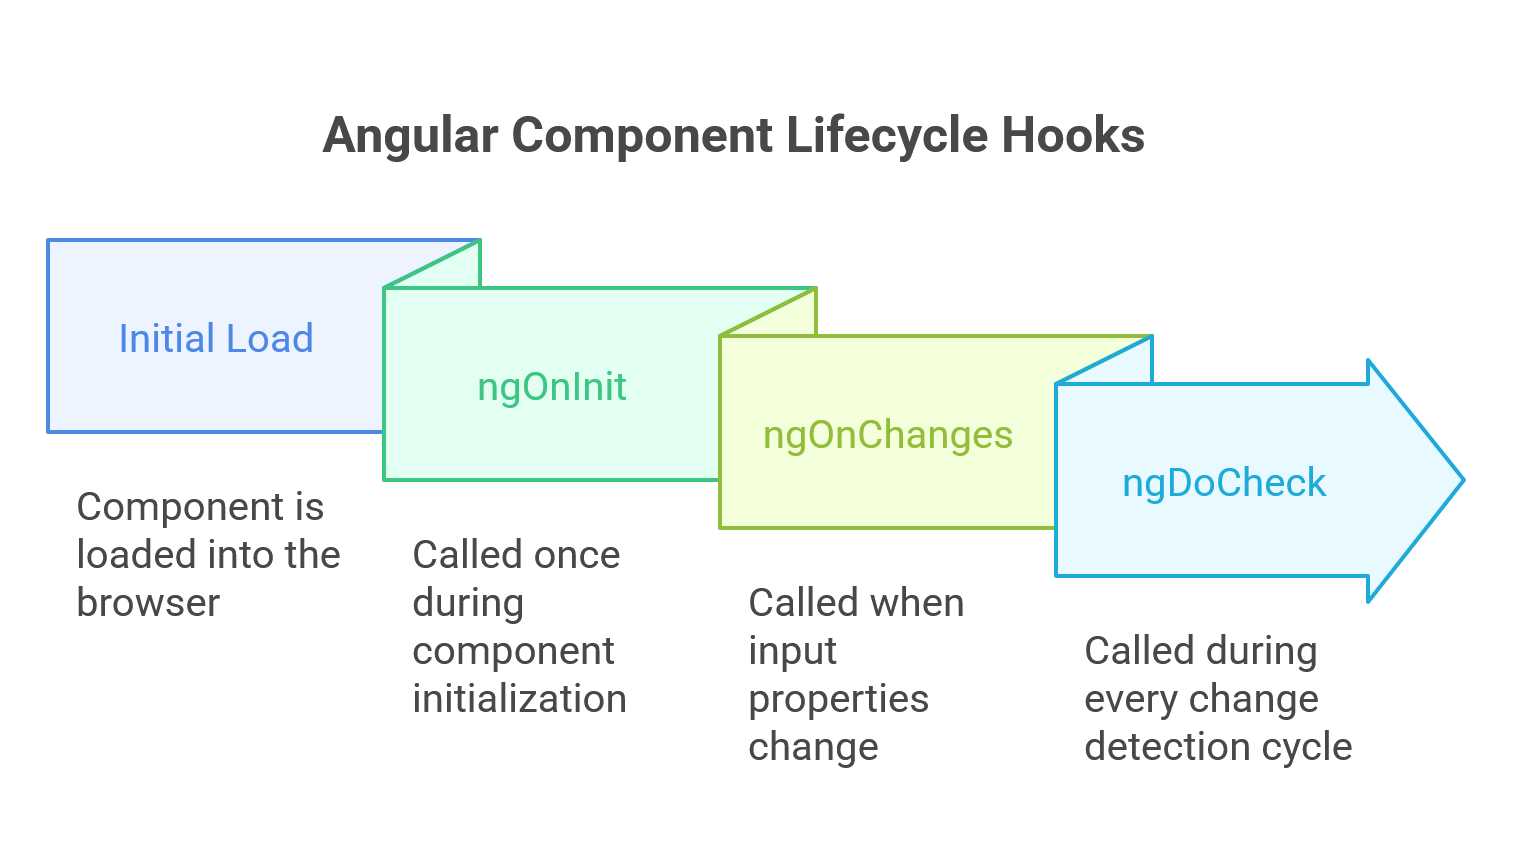
Responding to Change: ngOnChanges and ngDoCheck
After initialization, a component’s lifecycle is dominated by change detection. Two hooks, ngOnChanges and ngDoCheck, provide mechanisms to respond to these changes.
ngOnChanges(changes: SimpleChanges): This hook is called whenever Angular detects a change to a data-bound@Input()property. It is called beforengOnInitduring the component’s initial creation (if it has inputs) and then for every subsequent change to any input property.27 The method receives aSimpleChangesobject as an argument. This object is a map where keys are the names of the input properties that changed, and the values areSimpleChangeobjects containing thepreviousValue,currentValue, and a booleanfirstChangeflag. This allows developers to write logic that responds specifically to certain input changes.28ngDoCheck(): This hook acts as a custom extension to Angular’s default change detection mechanism. It is called during every change detection cycle, immediately afterngOnChanges(on change) andngOnInit(on first run).28 It gives developers an opportunity to implement their own change detection logic for scenarios that Angular might not catch on its own, such as when a property inside an object input is mutated without changing the object’s reference. However, because it runs with such high frequency, any logic placed withinngDoCheckcan have a significant negative impact on application performance and should be used with extreme caution.28
Code Example: ngOnChanges
import { Component, Input, OnChanges, SimpleChanges } from '@angular/core';

@Component({
  selector: 'app-child',
  template: `<p>Received message: {{ message }}</p>`
})
export class ChildComponent implements OnChanges {
  @Input() message: string;
  @Input() data: any;

  ngOnChanges(changes: SimpleChanges): void {
    console.log('ngOnChanges triggered:', changes);

    // Respond only when the 'message' input has changed
    if (changes['message']) {
      const messageChange = changes['message'];
      console.log(`Message changed from '${messageChange.previousValue}' to '${messageChange.currentValue}'`);
    }
  }
}
Rendering and DOM Interaction: Content and View Lifecycle Hooks
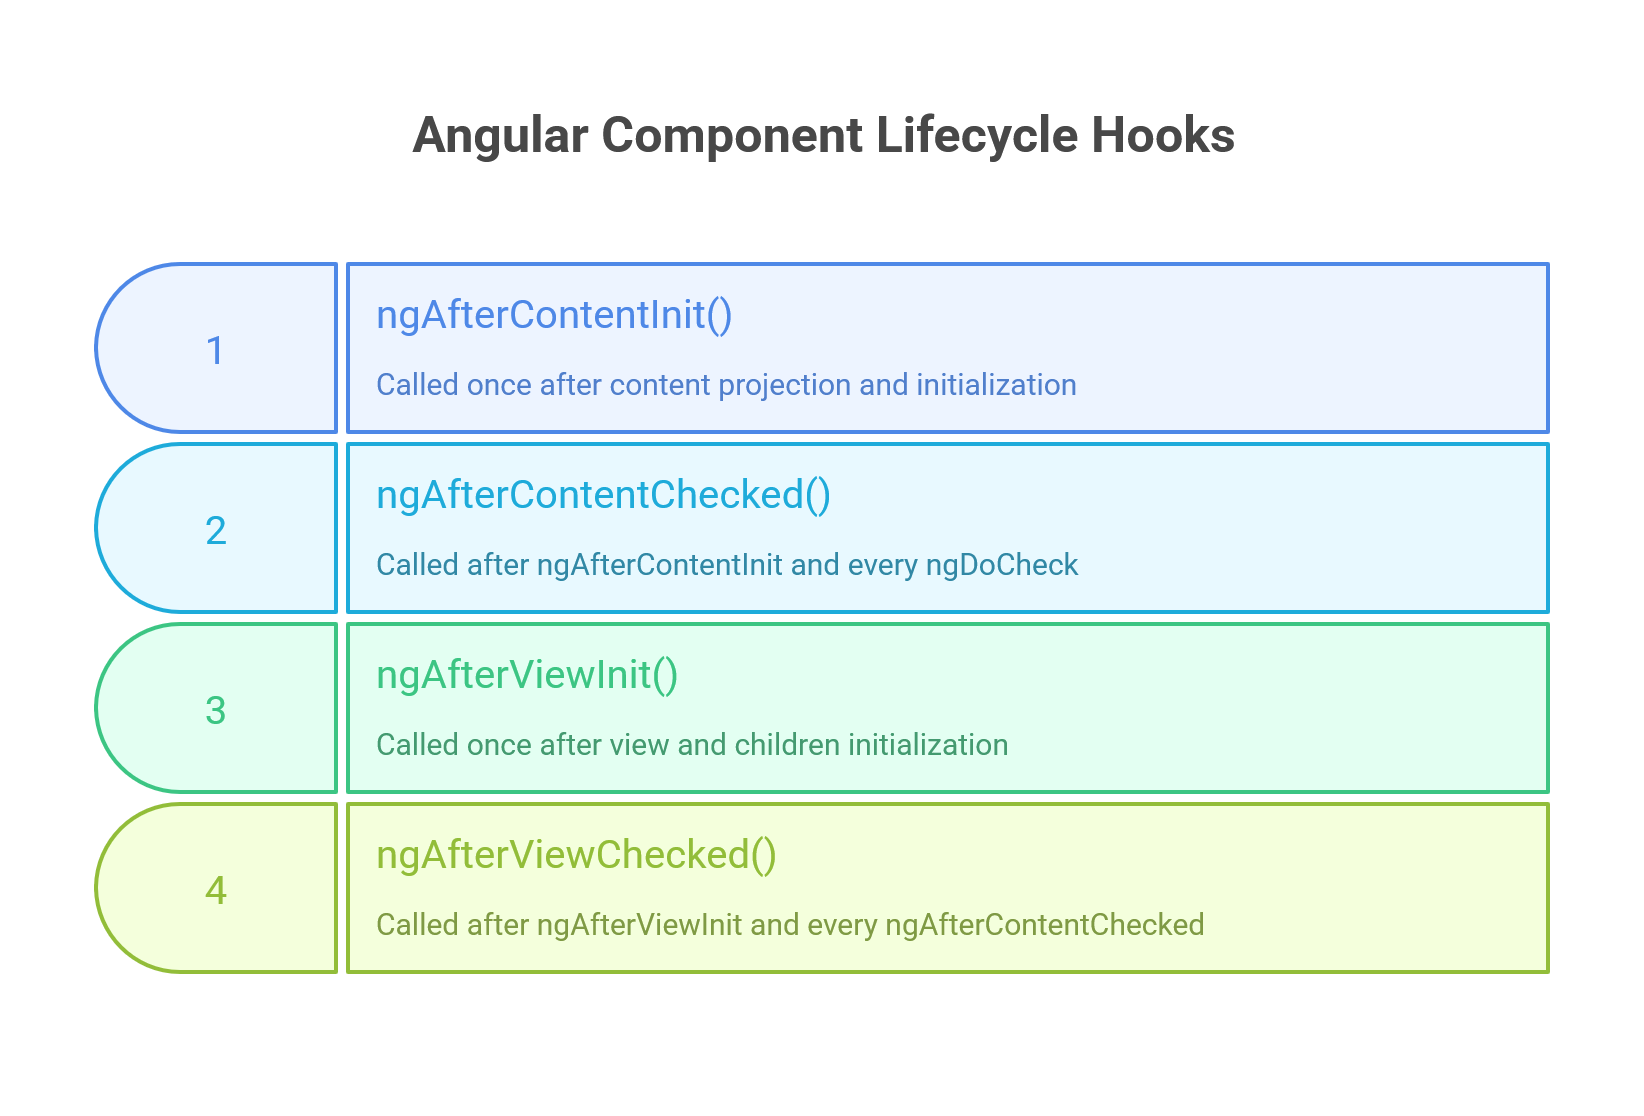
Once a component is initialized and its inputs are checked, Angular proceeds to render its view. This phase involves a set of hooks that fire after different parts of the component’s DOM are rendered. A critical distinction exists between content children—components or elements projected from a parent component via <ng-content>—and view children, which are defined directly within the component’s own template.36 The lifecycle hooks reflect this distinction, with “content” hooks always firing before “view” hooks.
ngAfterContentInit(): Called once, after Angular has performed content projection and initialized the projected content. This is the first moment that queries for projected content (using@ContentChildor@ContentChildren) will have their results available.29ngAfterContentChecked(): Called afterngAfterContentInit(on the first run) and after every subsequentngDoCheck. This hook responds to the checking of the projected content during each change detection cycle.29ngAfterViewInit(): Called once, after Angular has initialized the component’s own view and the views of its children. This is the first moment that queries for view children (using@ViewChildor@ViewChildren) will have their results available. It is often used for DOM manipulation that must occur after the view is fully rendered, such as initializing a third-party charting library on a<canvas>element.29ngAfterViewChecked(): Called afterngAfterViewInit(on the first run) and after every subsequentngAfterContentChecked. This hook responds to the checking of the component’s view during each change detection cycle.29
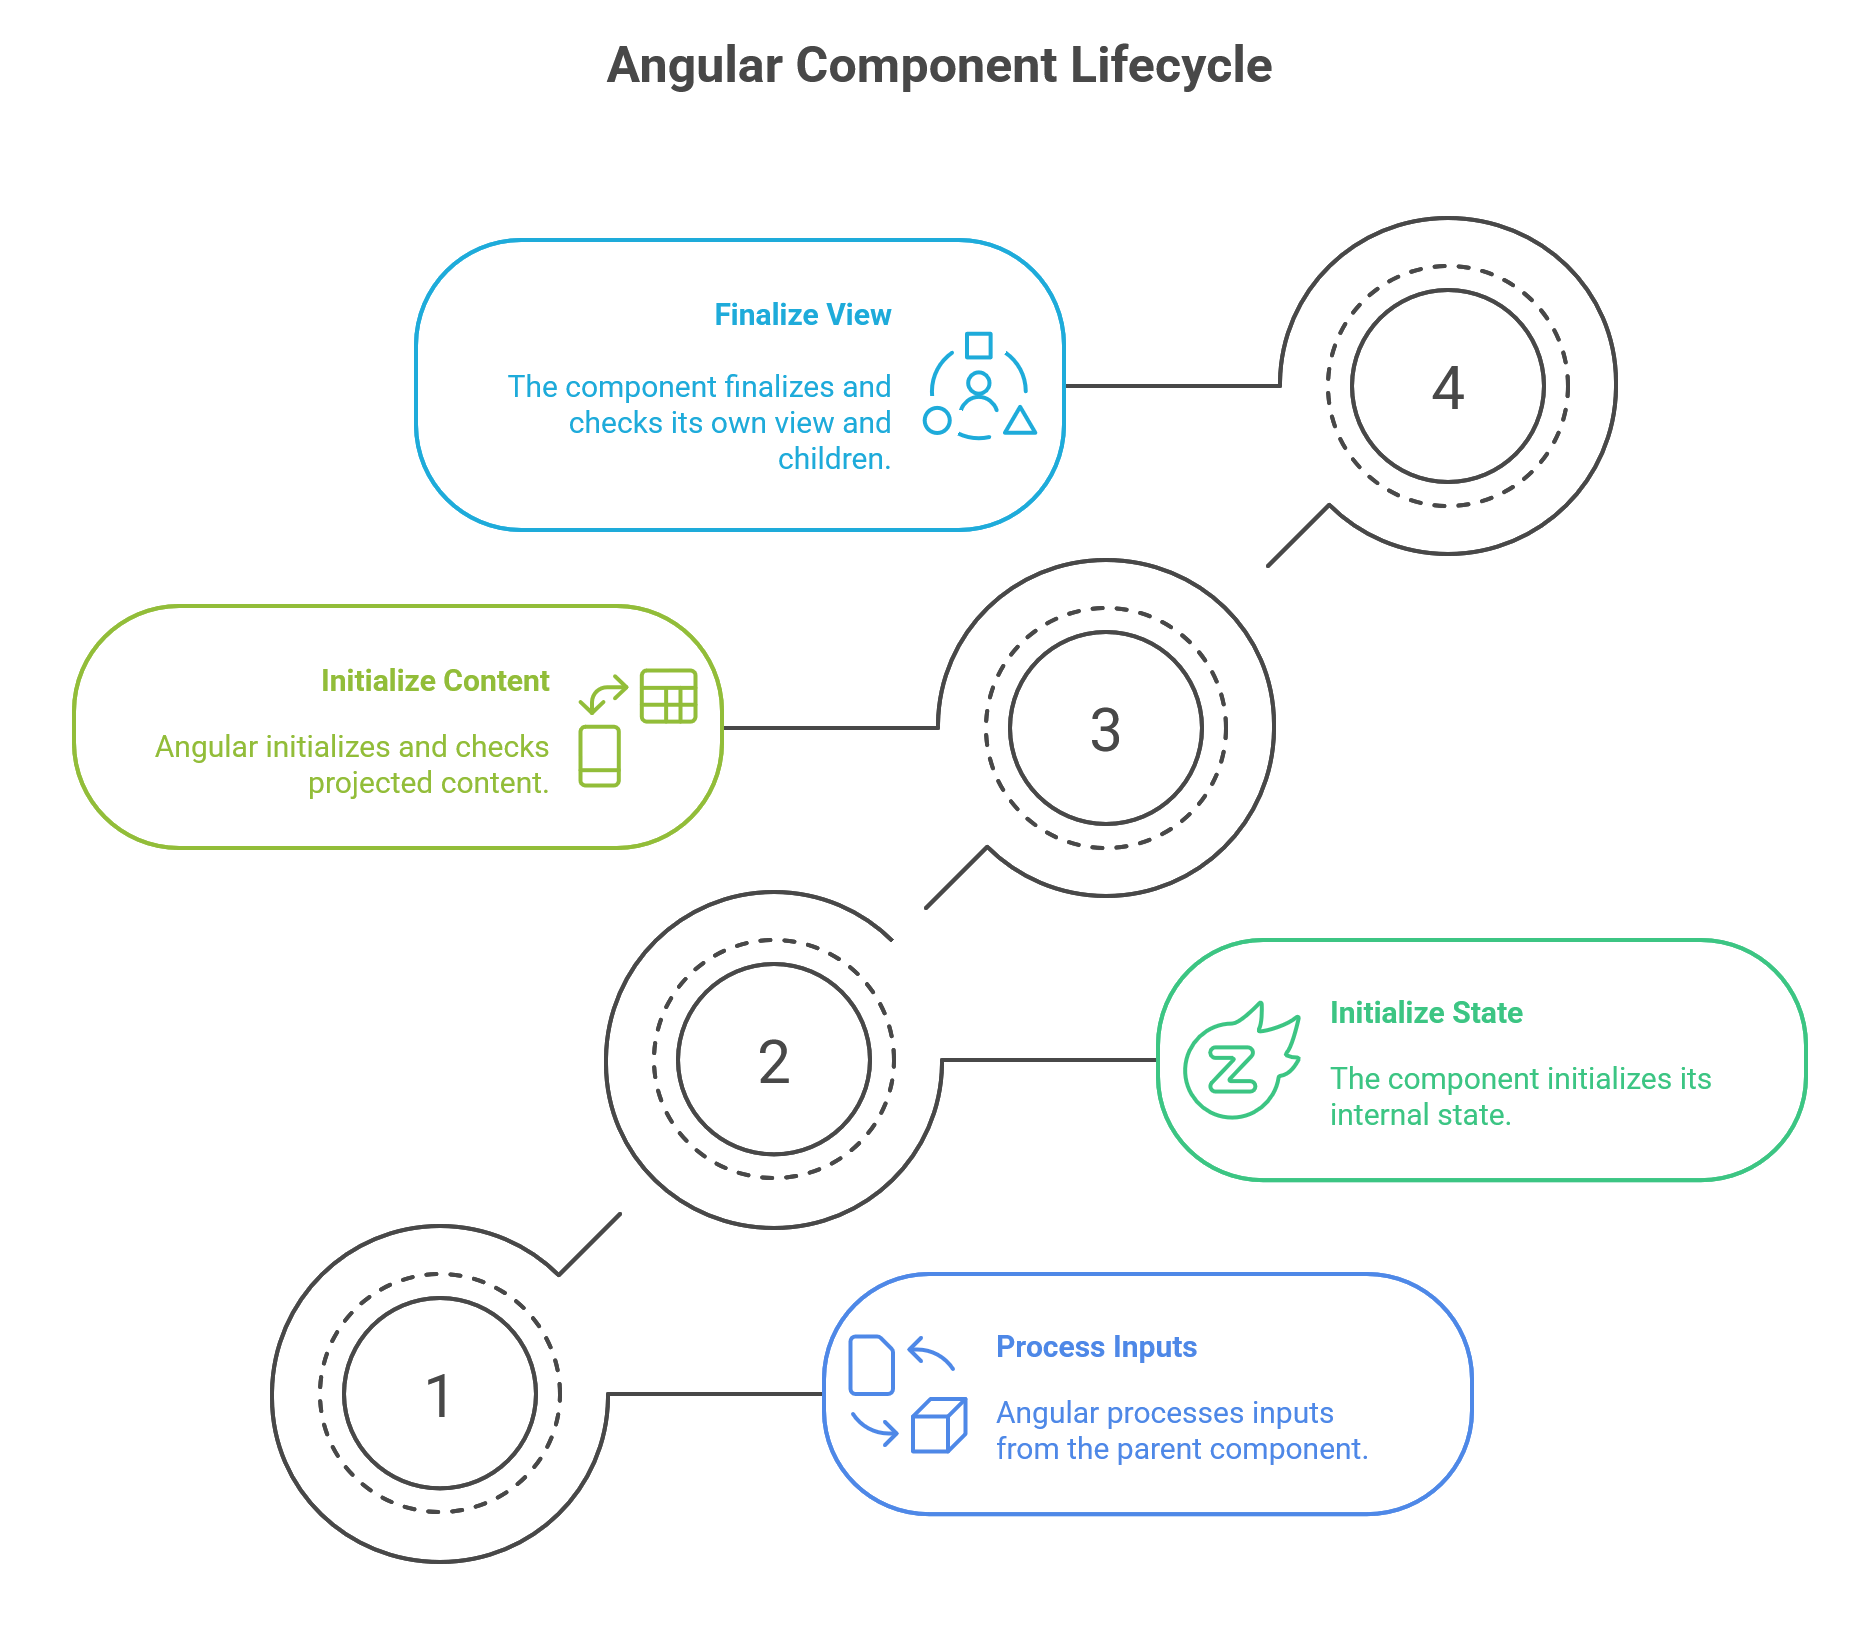
The strict, predictable sequence of these hooks is a direct manifestation of Angular’s top-down, unidirectional rendering process. Angular must first process inputs from a parent (ngOnChanges), then initialize the component’s state (ngOnInit). Before it can render its own view, it must first initialize and check any content projected into it (ngAfterContent...). Only then can it finalize and check its own view and the children defined within it (ngAfterView...). This rigid sequence prevents a class of UI bugs related to inconsistent state, such as the ExpressionChangedAfterItHasBeenCheckedError, by ensuring data always flows predictably down the component tree within a single change detection tick.
Termination and Cleanup: ngOnDestroy and DestroyRef
The final phase of a component’s lifecycle is its destruction, which occurs when it is removed from the DOM (for example, by an @if directive becoming false or by navigating to a different route).
ngOnDestroy(): This hook is called exactly once, immediately before Angular destroys the component. Its purpose is to perform essential cleanup to prevent memory leaks. Common cleanup tasks include unsubscribing from RxJS Observables, detaching DOM event listeners, and clearing timers (setInterval).27DestroyRef: A modern, injectable alternative to thengOnDestroyhook. By injectingDestroyRef, a developer can register one or more cleanup callbacks using itsonDestroymethod. This approach is particularly useful for building reusable logic (e.g., in a function or service) that needs to tie its cleanup to the lifecycle of a component. It also allows for co-locating setup and teardown logic, which can improve code readability and maintainability.28
Code Example: ngOnDestroy and DestroyRef
import { Component, OnInit, OnDestroy, inject, DestroyRef } from '@angular/core';
import { interval, Subscription } from 'rxjs';
import { takeUntilDestroyed } from '@angular/core/rxjs-interop';

@Component({
  selector: 'app-ticker',
  template: `<p>Timer: {{ count }}</p>`
})
export class TickerComponent implements OnInit, OnDestroy {
  count = 0;
  private intervalSubscription: Subscription;
  private destroyRef = inject(DestroyRef);

  ngOnInit(): void {
    // Traditional cleanup with ngOnDestroy
    this.intervalSubscription = interval(1000).subscribe(() => this.count++);

    // Modern cleanup with takeUntilDestroyed (powered by DestroyRef)
    interval(1000)
     .pipe(takeUntilDestroyed(this.destroyRef))
     .subscribe(() => console.log('This subscription cleans itself up!'));
  }

  ngOnDestroy(): void {
    // Essential cleanup to prevent memory leaks
    if (this.intervalSubscription) {
      this.intervalSubscription.unsubscribe();
      console.log('Interval subscription manually destroyed.');
    }
  }
}
| Hook Method | Purpose | Timing |
ngOnChanges() | Respond when Angular sets or resets data-bound input properties. | Called before ngOnInit() (if the component has bound inputs) and whenever one or more data-bound input properties change. |
ngOnInit() | Initialize the component after Angular first displays data-bound properties and sets input properties. | Called once, after the first ngOnChanges(). |
ngDoCheck() | Detect and act upon changes that Angular can’t or won’t detect on its own. | Called immediately after ngOnChanges() on every change detection run, and immediately after ngOnInit() on the first run. |
ngAfterContentInit() | Respond after Angular projects external content into the component’s view. | Called once after the first ngDoCheck(). |
ngAfterContentChecked() | Respond after Angular checks the content projected into the component. | Called after ngAfterContentInit() and every subsequent ngDoCheck(). |
ngAfterViewInit() | Respond after Angular initializes the component’s views and child views. | Called once after the first ngAfterContentChecked(). |
ngAfterViewChecked() | Respond after Angular checks the component’s views and child views. | Called after ngAfterViewInit() and every subsequent ngAfterContentChecked(). |
ngOnDestroy() | Cleanup just before Angular destroys the component to avoid memory leaks. | Called immediately before the component is destroyed. |
The Heart of Reactivity: Angular’s Change Detection Engine
At the core of Angular’s ability to create dynamic user interfaces is its change detection engine. This mechanism is responsible for synchronizing the application’s state (the data in its components) with the view (the DOM). It is a highly optimized and predictable system built on a foundation of unidirectional data flow, direct data comparison, and, traditionally, the pervasive influence of the zone.js library.
Core Principles: Unidirectional Data Flow and the Change Detection Tree
An Angular application is architecturally represented as a tree of components. The change detection process is a traversal of this tree, which always begins at the root component and proceeds downwards to its children in a predictable, depth-first manner.39
This traversal strictly adheres to a unidirectional data flow model.40 Data flows from parent components down to child components, typically through
@Input() bindings. During a single change detection cycle, a component’s state can affect its children, but a child cannot update its parent’s state. This one-way flow is a critical design choice that prevents the infinite loops and cascading updates that can plague systems with bidirectional data binding. It ensures that after a single pass down the tree, the application’s state becomes stable and predictable.40
A Tale of Two Paradigms: Angular’s Mechanism vs. the Virtual DOM
While many modern frameworks use a Virtual DOM (VDOM) to manage UI updates, Angular employs a different, more direct approach.
- React’s Virtual DOM (VDOM): Frameworks like React operate on an in-memory abstraction of the DOM. When a component’s state changes, a new VDOM tree is generated.46 The framework then executes a “diffing” algorithm to compare this new VDOM with the previous one, identifying the minimal set of changes required.46 Finally, these changes are applied to the real DOM in a batched update. This approach offers great flexibility, as a component’s render function can return any UI structure, but it can be memory-intensive due to the constant creation of VDOM trees, and the diffing algorithm itself is a non-trivial computation.46
- Angular’s Change Detection: Angular forgoes the VDOM in favor of a mechanism that leverages the static nature of its templates. For each component, the Angular compiler generates a data structure, or “Logical View,” that holds the previous values of all expressions used in its template.46 During a change detection cycle, Angular traverses this tree of logical views and performs dirty checking. This is a straightforward process of comparing the current value of each data-bound property against its stored previous value, typically using a strict equality check (
===).44 If a value has changed, Angular knows precisely which part of the real DOM to update and modifies it directly.40 Because the template structure is known at compile time, the Ivy compiler can generate highly optimized, monomorphic JavaScript code specifically tailored to check that component’s bindings, making the process extremely fast.46
The Engine Room: The Critical Role of zone.js and Monkey-Patching
The central question for any change detection system is: how does the framework know when to run it? Angular’s traditional answer to this question is a powerful third-party library called zone.js.
The inclusion of zone.js represents a significant architectural trade-off, prioritizing developer experience and convenience over performance transparency and granular control. For a developer, the fact that updating a property within a setTimeout callback or an HTTP response handler automatically updates the UI feels magical and lowers the barrier to entry.50 However, this “magic” is a black box. As applications scale, the indiscriminate, global nature of
zone.js can become a major performance bottleneck, triggering far more change detection cycles than are actually necessary.50 This inherent tension between convenience and performance has been a primary driver of Angular’s architectural evolution, leading to the creation of optimization strategies and, ultimately, the new zoneless model.
- The
zone.jsExecution Context: A “zone” is an execution context that persists across asynchronous operations.48 When an Angular application bootstraps, it runs inside a special zone created by Angular calledNgZone.54 - Monkey-Patching: To track asynchronous activity,
zone.jsuses a technique called monkey-patching. It overrides most of the browser’s native asynchronous APIs, includingsetTimeout,setInterval,Promise,XMLHttpRequest, and, most importantly,addEventListener(which handles all DOM events like clicks and keyboard inputs).48zone.jsreplaces these native functions with its own versions that wrap the original functionality. These wrappers notify the current zone before and after the original async task is executed. - The Trigger Mechanism: The process works as follows:
- An asynchronous event occurs (e.g., a user clicks a button, an HTTP request completes).
- The
zone.jspatched version of the API (e.g.,addEventListener) executes the application’s event handler. - After the handler completes,
zone.jsnotifiesNgZonethat an asynchronous task has finished. NgZonewaits for the JavaScript VM’s task queue (specifically, the microtask queue) to become empty.- Once the queue is empty,
NgZoneemits an event (onMicrotaskEmpty). - Angular’s
ApplicationRefis subscribed to this event and, in response, calls itstick()method, which initiates a change detection cycle from the root of the application.21
runOutsideAngular(): Becausezone.jstriggers change detection for any completed async task, it can lead to performance problems when dealing with frequent events (like mouse movements orrequestAnimationFrame) or third-party libraries that are not “zone-aware.” To solve this, Angular provides theNgZone.runOutsideAngular()method. Any code executed within this method’s callback will not trigger a change detection cycle, giving developers an “escape hatch” to perform work that shouldn’t cause the entire UI to be re-checked.43
Code Example: zone.js Triggering Change Detection
TypeScript
import { Component } from '@angular/core';

@Component({
  selector: 'app-timer',
  template: `<p>Message: {{ message }}</p>`
})
export class TimerComponent {
  message = 'Waiting...';

  constructor() {
    setTimeout(() => {
      // This code runs inside an async callback.
      // 1. The `setTimeout` is patched by zone.js.
      // 2. When the 2-second timer completes, zone.js notifies NgZone.
      // 3. NgZone triggers a change detection cycle.
      // 4. Angular detects the `message` property has changed and updates the DOM.
      this.message = 'Hello from the future!';
    }, 2000);
  }
}
Performance Optimization: OnPush Strategy and Manual Control with ChangeDetectorRef
The default change detection strategy, where every component is checked on every cycle, is simple but can be inefficient in large applications. To address this, Angular provides the OnPush strategy and tools for manual control.
OnPushChange Detection Strategy: By settingchangeDetection: ChangeDetectionStrategy.OnPushin a component’s metadata, developers instruct Angular to skip checking this component and its entire subtree during a change detection cycle unless one of the following conditions is met 43:- An
@Input()property on the component receives a new reference. Mutating an existing object or array input will not trigger change detection. - An event (like a
(click)) is fired from the component’s template or one of its children. - An observable bound to the template via the
asyncpipe emits a new value. - Change detection is explicitly requested for the component using
ChangeDetectorRef.
- An
The OnPush strategy is more than just a performance optimization; it implicitly guides developers toward adopting immutability and more predictable state management patterns. Because it only triggers on new input references, it forces developers to avoid direct mutation (e.g., this.data.push(newItem)) in favor of creating new objects or arrays (e.g., this.data = [...this.data, newItem]).48 This pattern of using immutable data structures makes state changes explicit and easier to track, discouraging side effects and aligning with the foundational principles of modern reactive architectures like those powered by Signals.
- Manual Control with
ChangeDetectorRef: This injectable service provides direct control over a component’s change detector.detectChanges(): This method immediately runs change detection for the component and its descendants. It is a powerful but blunt tool, often used in combination withdetach()to implement highly customized, local change detection strategies.40markForCheck(): This is the preferred method forOnPushcomponents. It does not trigger change detection immediately. Instead, it marks the component and all of its ancestors as “dirty.” This guarantees that the component will be checked during the next change detection cycle initiated byzone.jsor another trigger. It is the correct way to notify Angular of an internal state change (e.g., data arriving from an observable subscription) within anOnPushcomponent.40
Code Example: OnPush with markForCheck()
TypeScript
import { Component, ChangeDetectionStrategy, ChangeDetectorRef, OnInit, inject } from '@angular/core';
import { DataService } from './data.service';

@Component({
  selector: 'app-onpush-data',
  template: `
    <div *ngIf="data">{{ data.value }}</div>
    <button (click)="loadData()">Refresh Data</button>
  `,
  changeDetection: ChangeDetectionStrategy.OnPush
})
export class OnPushDataComponent implements OnInit {
  data: { value: string };
  private cdr = inject(ChangeDetectorRef);
  private dataService = inject(DataService);

  ngOnInit(): void {
    this.loadData();
  }

  loadData(): void {
    this.dataService.getAsyncData().subscribe(newData => {
      this.data = newData;
      // The data has changed, but since this happened inside an async
      // subscription, the OnPush component won't update automatically.
      // We must manually mark it for the next change detection cycle.
      this.cdr.markForCheck();
    });
  }
}
The Next Generation: Zoneless Rendering with Signals
The architectural evolution of Angular has culminated in a new paradigm for reactivity: a zoneless rendering model powered by Signals. This represents the framework’s most significant shift, moving away from the implicit, global change detection of zone.js toward an explicit, fine-grained system that offers superior performance, smaller bundle sizes, and an improved developer experience.
The “Why”: Motivations for a Zoneless Architecture
The decision to make zone.js optional and introduce a new reactivity model was driven by a desire to overcome the inherent limitations of the zone-based approach.
- Performance: The primary motivation is performance.
zone.jsis indiscriminate; it triggers a full change detection cycle for any asynchronous event, regardless of whether application state actually changed. This results in unnecessary computation and rendering work. A zoneless model allows for surgical updates, only re-rendering the parts of the UI that are directly affected by a state change.52 - Bundle Size:
zone.jsis a non-trivial dependency that adds to the final application bundle size. Removing it leads to smaller, faster-loading applications, which is critical for Core Web Vitals and user experience.52 - Developer Experience and Debugging: The “magic” of
zone.jscan make debugging difficult. Stack traces are often polluted with zone-specific calls, making it hard to trace the origin of an issue. A zoneless approach is more explicit and predictable, as the developer knows exactly what causes the UI to update.51 - Ecosystem Compatibility: The monkey-patching technique used by
zone.jscan cause conflicts with modern browser APIs (such as nativeasync/await) and third-party libraries that were not designed with it in mind. Removing this layer of patching improves compatibility and future-proofs the framework.72
This shift realigns Angular with the broader web ecosystem. By making zone.js optional, Angular reduces its framework-specific magic and adopts a reactivity model conceptually similar to primitives found in other modern frameworks like SolidJS and Vue. This conceptual alignment improves interoperability and makes Angular easier to learn for developers from other backgrounds, positioning it as a more “well-behaved” citizen of the web platform.76
Signals: Angular’s New Reactive Primitive
At the heart of the zoneless model is a new reactive primitive: the Signal. A Signal is a wrapper around a value that can notify interested consumers when that value changes. It provides a simple, synchronous API for state management.78
- Writable Signals (
signal): These are the foundation. They are created using thesignal()function with an initial value. To read a signal’s value, you call it as a function (e.g.,mySignal()). To update it, you use the.set(newValue)or.update(currentValue =>...)methods.79 - Computed Signals (
computed): These are read-only signals whose values are derived from one or more other signals. They are created with thecomputed()function. A computed signal automatically tracks its dependencies and re-calculates its value only when one of those dependencies changes. The results are also memoized (cached), so the derivation function doesn’t re-run if the dependencies haven’t changed.79 - Effects (
effect): These are operations that execute in response to changes in signal values. They are created with theeffect()function. Effects are used for side effects that don’t directly produce a value for the UI, such as logging, synchronizing data with browser APIs likelocalStorage, or performing imperative DOM manipulation (e.g., with a charting library).79
Code Example: Writable, Computed, and Effect Signals
TypeScript
import { Component, signal, computed, effect } from '@angular/core';

@Component({
  selector: 'app-signal-demo',
  standalone: true,
  template: `
    <p>Count: {{ count() }}</p>
    <p>Double Count: {{ doubleCount() }}</p>
    <button (click)="increment()">Increment</button>
  `
})
export class SignalDemoComponent {
  // 1. Writable Signal
  count = signal(0);

  // 2. Computed Signal
  doubleCount = computed(() => this.count() * 2);

  constructor() {
    // 3. Effect
    effect(() => {
      console.log(`The current count is: ${this.count()}`);
    });
  }

  increment() {
    this.count.update(value => value + 1);
  }
}
The Zoneless Change Detection Model: How It Works
The introduction of Signals is the culmination of Angular’s architectural journey toward performance and predictability. It directly solves the core problem that OnPush was designed to mitigate, but in a more fundamental way. Instead of the environment (async events via zone.js) telling the framework to check for changes, the data itself (the signal) tells the framework precisely what has changed. This is a paradigm shift from an event-driven trigger to a state-driven one, enabling a far more efficient, fine-grained reactivity model.
- Configuration: A zoneless application is enabled by providing
provideZonelessChangeDetection()(or its experimental predecessor) in the application’s providers and completely removingzone.jsfrom the project’spolyfillsconfiguration and dependencies.71 - Fine-Grained Reactivity: The mechanism is elegantly simple. When a signal’s value is read within a component’s template (e.g.,
{{ count() }}), Angular’s rendering engine automatically registers that part of the view as a consumer of that signal. This creates a precise dependency graph. When the signal is later updated, Angular doesn’t need to guess or check the entire component tree. It knows exactly which components and DOM nodes depend on that signal and schedules an update for only those specific parts.79 This is true local change detection. - Triggers in a Zoneless World: Without
zone.jsto automatically trigger change detection, the framework relies on a small, explicit set of triggers to schedule UI updates 72:- Updating a signal that is read in a template.
- A bound event listener in a template (e.g.,
(click)). - The
asyncpipe emitting a new value from an observable (it callsmarkForCheckinternally). - Manually calling
ChangeDetectorRef.markForCheck(). - Attaching a view that was previously marked as dirty.
| Triggering Mechanism | Zone.js-based Model (How it works) | Zoneless/Signal-based Model (How it works) |
User Interaction (e.g., (click)) | zone.js patches addEventListener, detects event completion, and triggers a global change detection cycle. | The event binding is a direct trigger. Angular schedules a check for the component and its ancestors. |
Timers (e.g., setTimeout) | zone.js patches setTimeout, detects callback completion, and triggers a global change detection cycle. | Does NOT trigger change detection. State changes must be wrapped in a Signal or followed by a manual markForCheck() call. |
HTTP Requests (e.g., fetch) | zone.js patches XMLHttpRequest or Promise, detects completion, and triggers a global change detection cycle. | Does NOT trigger change detection. The result must be fed into a Signal (e.g., via toSignal()) or followed by markForCheck(). |
Direct State Change (e.g., this.value = 'new') | Does not trigger change detection on its own; must be part of a zone-managed async task. | Does not trigger change detection. The state must be held in a Signal (this.value.set('new')) to be reactive. |
Architectural Implications and Migration Strategies
Adopting a zoneless architecture requires a shift in development patterns toward a more explicitly reactive style.
- Migration Path: The path to a fully zoneless application is gradual.
- Adopt
OnPush: The first step is to refactor components to useChangeDetectionStrategy.OnPush. An application that functions correctly withOnPushis already well-aligned with zoneless principles, as it no longer relies on global state changes to trigger updates.72 - Integrate Signals: Begin refactoring component state to use Signals. Replace simple properties with
signal(), derived getters withcomputed(), and convert observable-based data streams to signals using thetoSignal()interop function.73 - Handle Asynchronicity Manually: For any remaining asynchronous operations that are not managed by the
asyncpipe or Signals (e.g., asetIntervalthat updates a plain property), you must manually notify Angular of the state change by injectingChangeDetectorRefand callingmarkForCheck().71
- Adopt
Code Example: Zoneless Component with setInterval
TypeScript
import { Component, ChangeDetectorRef, inject } from '@angular/core';

@Component({
  selector: 'app-zoneless-ticker',
  standalone: true,
  template: `<p>Zoneless Timer: {{ tick }}</p>`
})
export class ZonelessTickerComponent {
  tick = 0;
  private cdr = inject(ChangeDetectorRef);

  constructor() {
    setInterval(() => {
      this.tick++;
      // In a zoneless app, this change is invisible to Angular.
      // We must manually mark the component to be checked.
      this.cdr.markForCheck();
    }, 1000);
  }
}
This manual step is elegantly replaced by using a signal, which handles the notification automatically:
Code Example: Zoneless Component with Signals
TypeScript
import { Component, signal } from '@angular/core';

@Component({
  selector: 'app-zoneless-signal-ticker',
  standalone: true,
  template: `<p>Zoneless Signal Timer: {{ tick() }}</p>`
})
export class ZonelessSignalTickerComponent {
  tick = signal(0);

  constructor() {
    setInterval(() => {
      // Updating the signal automatically schedules a check for any
      // components that read its value. No manual call is needed.
      this.tick.update(current => current + 1);
    }, 1000);
  }
}
This evolution towards a zoneless, signal-based architecture represents Angular’s commitment to performance, modern development patterns, and a more transparent and predictable developer experience, solidifying its position as a robust framework for building demanding web applications.